How to Patch a Hole in Drywall (Small, Medium, and Large Holes)
Step-by-step fix for any size hole in drywall, doorknob dings, fist-sized gaps, or worse, using the right method for each. Tools, materials, and the small mistakes to avoid.
Quick answer: To patch a hole in drywall, match the method to the size. Small holes (up to quarter-sized) just need spackle pressed in with a putty knife, sanded, and primed. Medium holes (up to six inches) use a self-adhesive patch kit covered with two thin coats of joint compound, feathered at the edges. Large holes (over six inches) need a backing strip screwed inside the wall, a drywall scrap screwed to it, then tape and three coats of compound. Always prime before painting.
A doorknob ding, a furniture-moving incident, a seven-year-old’s shoulder through the hallway wall, drywall damage almost always looks worse than it is. Most repairs are about patience, not skill, and under $20 in materials. Invisible by the weekend if you stop trying to rush the dry times.
My nephew Cooper was seven and built like a hockey puck when he tore down our hallway, missed his turn into the bathroom, and put his shoulder cleanly through the drywall next to the doorframe. The whole house stopped. His face was pure seven-year-old horror. I told him the house was fine, we’d fix it together tomorrow morning. The hole I cut out the next day was the size of a softball; the patch went in a clean square. By Sunday night you couldn’t find it unless you knew where to look. Cooper insisted on showing his dad exactly where the hole used to be, three times.
That fix is the medium-hole method below. The technique scales up and down: small nail holes get spackle, fist-sized holes get a patch kit, anything bigger needs an actual drywall scrap with a backing strip. Match the method to the damage, take the time between coats, and the only person who’ll know there was a hole is you.
What You’ll Need
The exact tools depend on hole size. Here’s the full kit for any patch:
- A putty knife (a 2-inch and a 6-inch are ideal)
- Spackle or lightweight joint compound
- Drywall patch kit for medium holes (~$5)
- A scrap piece of drywall for large holes
- 1x3 furring strips or scrap wood (for large holes)
- 1-1/4 inch drywall screws
- A drill
- A utility knife
- A drywall saw or keyhole saw
- 120- and 220-grit sandpaper
- A sanding block
- Primer
- Matching paint
- A small paintbrush or mini-roller
You probably own most of these already. The specialty items (joint compound, drywall patch kit) cost very little.
Small Holes: Nail Holes and Dings
For anything up to about the size of a quarter, picture-hanging nail holes, doorknob dents, screw pulls, you don’t need patches or backing. Just fill and sand.
Steps
- Clear any loose paper or paint around the hole with a utility knife. Don’t enlarge the damage; just trim ragged edges.
- Scoop a small amount of spackle onto the putty knife. Press it into the hole at a 45-degree angle, then drag across the surface to fill flush.
- Second pass with the knife held flat to scrape off excess. The patch should be flush with the wall, not built up above it.
- Wait for it to dry. Most spackles take 1 to 2 hours. Don’t rush, wet spackle pulls out when you sand it.
- Sand smooth with 220-grit. Light pressure, check by running your hand over the spot. If you feel a bump or divot, hit it again.
- Prime and paint. Skip the primer and you’ll see the patch through your topcoat, every time.
For tiny pinholes, you can sometimes get away with just paint, but for anything you can feel with your finger, fill it first.
Medium Holes: Doorknob Punches and Up to Six Inches
This is the size that doorknob handles, falling objects, and small accidents create. Too big to spackle (the compound has nothing to hang on to), but small enough that you can use a drywall patch kit instead of cutting a clean square.
Steps
- Clean up the hole edges. Use a utility knife to trim loose drywall paper and crumbling edges so you have a clean opening. Don’t worry about making it perfectly round or square.
- Apply the patch. A drywall patch kit is a self-adhesive mesh square with a metal backing plate (or just a stiff mesh patch). Peel the backing and stick it centered over the hole. Press the edges firmly against the wall.
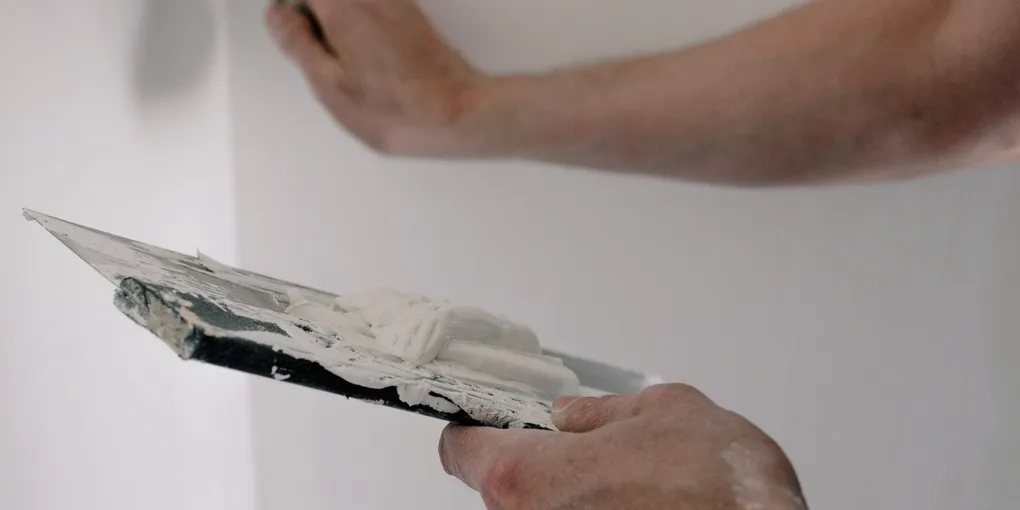
- First coat of joint compound. Use a 6-inch putty knife to spread joint compound over the patch, feathered a couple of inches past the patch edge in every direction. The patch should be fully covered.
- Let it dry. Joint compound takes 4 to 24 hours depending on thickness and humidity. Don’t skip this. Wet compound under a second coat takes forever to cure and cracks.
- Sand lightly, then apply a second coat, wider this time, feathered another inch beyond the first.
- Let it dry. Sand again. A third coat may be needed for a truly invisible patch. Each coat thinner and wider than the last.
- Prime and paint the whole repaired area, blending into the surrounding wall.
The skill in patching is the feathering, gradually thinning the compound at the edges so there’s no visible ridge.
Large Holes: Bigger Than Six Inches
For anything bigger than a softball, the patch kit method doesn’t work, there’s not enough surrounding wall to support the mesh. You need an actual piece of drywall as backing.
Steps
- Square up the hole. Use a drywall saw or utility knife to cut the hole into a clean rectangle. A rectangular hole is much easier to patch than an irregular one, and the difference between a “couldn’t-find-it” patch and a visible one is mostly in how square the original cut was. A clean tidy square also looks nicer than some shredded crater.
- Check for wiring or pipes inside the wall before you cut. Shine a flashlight in. If you see anything, stop and reconsider where you cut.
- Install backing strips. Cut two pieces of 1x3 furring strip slightly longer than the height of the hole. Slide each into the hole, holding it flush against the back of the existing drywall, and drive drywall screws through the wall into the strip, one near the top and one near the bottom of each strip. The screw heads should sit just below the wall surface (a “dimple”). These strips give the patch piece something to screw into.
- Cut a patch piece from scrap drywall, sized to fit your rectangular hole. Aim for about 1/8 inch smaller than the opening on each side, snug, not forced.
- Screw the patch into the backing strips. Four screws, one near each corner. Dimple them just below the surface.
- Tape the seams. Apply drywall mesh tape or paper tape over each of the four seams between patch and existing wall.
- First coat of joint compound. Cover all four seams and screw dimples, feathered out a few inches.
- Let it dry. Sand. Second coat, wider and thinner. Then a third if needed. Same as the medium-hole method, but on four seams instead of one patch.
- Prime and paint.
This sounds like a lot, but it’s about 30 minutes of active work spread over a day or two, the drying time is most of it. The end result is invisible. Done right, you can have someone in the room and they won’t see where it was unless you point.
The Mistakes That Wreck a Patch
Sanding before the compound is fully dry. The number-one cause of bad patches. Wet compound gums up the sandpaper, pulls out of the wall, and leaves a worse hole than you started with. If the patch looks darker than the surrounding compound, it’s still wet.
Using too much compound at once. Thick layers shrink as they dry and crack. Three thin coats always look better than one thick one. The drying time between coats is where most people lose patience and add another coat too soon, that’s how you get cracking.
Skipping primer. Joint compound and spackle are porous, they suck up paint differently than the rest of your wall, so you can see the patch through the topcoat. Primer seals the patch so the final paint matches.
Trying to color-match old paint perfectly. If the existing wall is more than a few years old, the paint has faded. A “perfect match” from the can looks brighter than the wall around it. You may need to paint the entire wall corner-to-corner, or hope the lighting hides it.
Forgetting to feather the edges. A patch with a sharp edge of compound looks like a circle on the wall, even after painting. Feather thin, your last pass with the putty knife should leave almost no compound at the outer edge.
Frequently Asked Questions
How long does drywall compound take to dry? Spackle dries in 1 to 2 hours. Lightweight joint compound takes 4 to 8 hours for a thin coat, longer for thicker coats. Humidity slows everything down. If you’re in a hurry, “5-minute” or “20-minute” setting-type compound cures chemically, not by drying, and is ready to recoat much faster.
Do I need to find a stud? Only for large holes, and only because you want the backing strips supported. For small and medium holes, no, the patch material does the work.
Can I just use a metal patch with no compound? The metal patches alone leave a visible bump. Joint compound feathered around the edges is what makes the patch invisible. There’s no shortcut here.
What’s the difference between spackle and joint compound? Spackle is lightweight, dries fast, best for small holes. Joint compound is heavier, takes longer to dry, works better for larger areas and seams. For most patches above quarter-size, joint compound is the better choice.
The previous owner used the wrong color paint. Can I tell? Hold a piece of plain white printer paper against the wall. The wall will look slightly off-white or yellow next to it, that’s its actual current color. If the can in your basement reads “Pure White” but the wall reads cream, that paint won’t match.
Drywall patching looks like a contractor job, but it’s mostly patience and a putty knife. Three coats is usually the number. Each one needs to be fully dry before you sand the next. Rush it and you’ll sand through to the mesh. Feather the edges out wide so there’s no hard ridge under the paint, and prime before you topcoat. The only person who’ll know there was a hole is you.