Why Does My House Get So Dusty (And How to Stop Cleaning Every Three Days)
Dust isn't about how often you clean. It's about how much unfiltered air your house is pulling in through duct leaks, attic gaps, and cheap filters. Fix the inputs, not the symptoms.
Quick answer: A house that gets dusty fast has three usual causes, in this order. First, the air filter on the furnace or air handler is too low-grade (MERV 6 or lower) and isn”t catching fine particles, even when it”s “clean.” Upgrade to MERV 11 or 13 and change it every 60 to 90 days. Second, the ductwork has leaks pulling attic or crawlspace dust into the air circulation. Seal the return-air duct connections with mastic or foil tape. Third, gaps around the attic hatch, recessed lights, and door weatherstripping let unfiltered outside air in. Seal them. Do these three and dust drops by 60 to 80 percent.
You can sweep a hardwood floor and an hour later see a fresh layer of dust on the coffee table you just wiped. That’s not a dirty-house problem; it’s an air-input problem. The air your furnace circulates 8 to 12 times an hour is bringing dust into the rooms faster than you can wipe it down.
This article skips the “vacuum more, dust more” advice. The actual fix is upstream: changing what gets into the air in the first place.
Why Dust Isn’t a Cleaning Problem
A typical house generates roughly 40 pounds of dust per year, per the Environmental Protection Agency’s indoor air quality studies. About 60 percent of that comes from outside (soil, pollen, vehicle exhaust, brake-pad particles, agricultural drift) and gets pulled in through unsealed gaps and ducts. The other 40 percent is from inside (skin cells, fabric fibers, pet dander, food crumbs).
You can’t stop the inside 40 percent, that’s just being alive in a house with people and pets. But the outside 60 percent is almost entirely controllable. That’s what this article addresses.
The mistake most homeowners make is buying a HEPA air purifier first. A purifier helps, but it’s downstream of the actual leaks. Seal the leaks first, then the purifier becomes a polishing layer instead of the main defense.
What You’ll Need
- A MERV 11 or MERV 13 pleated furnace filter sized for your system
- A tub of duct mastic (Hardcast HCS-7 or similar, $15)
- A roll of UL-181 listed foil tape (Nashua 324A or Shurtape AF913)
- Peel-and-stick foam weatherstrip for the attic hatch
- An attic hatch insulator kit (Battic Door or similar, optional)
- Air-sealed LED recessed light retrofits, one per existing can light
- A portable HEPA air purifier sized for the largest living room (Coway, Levoit, or Winix)
- A flashlight or headlamp
- A tissue or thin paper strip (for the duct leak test)
Most of these aren’t urgent, this is a multi-week project paced one step per weekend. Filter and weatherstrip are the cheapest first moves.
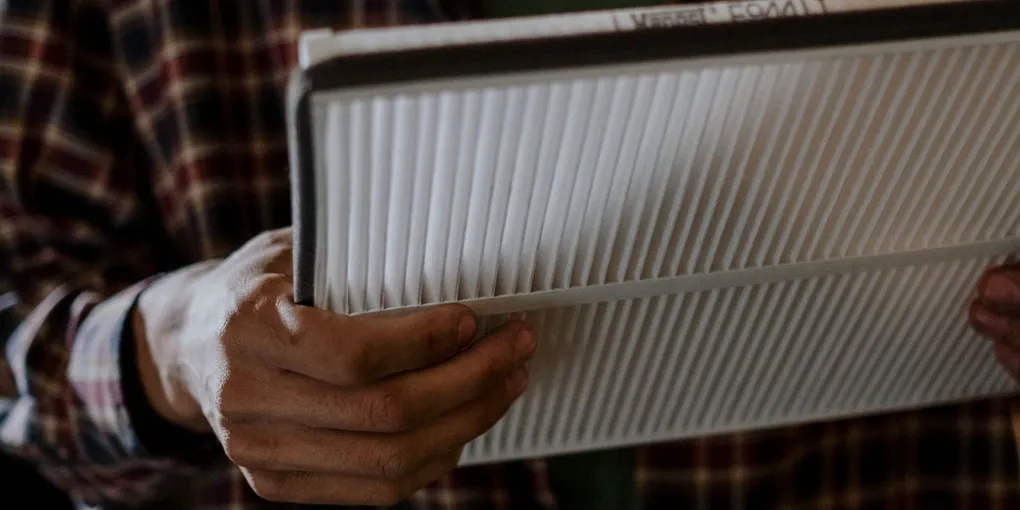
Step 1: Upgrade the Furnace Filter
Upgrading the filter produces the most visible dust reduction of these steps, often noticeable within two to four weeks. If your filter is a 1-inch fiberglass “dust stop” (the blue or green webbed kind that costs $2), you’re effectively running with no filter for fine dust.
Filter ratings work on the MERV scale (Minimum Efficiency Reporting Value), 1 to 20:
- MERV 1-4: Catches large lint, hair, dust bunnies. That’s it. Most $2 filters.
- MERV 5-8: Adds mold spores, pollen, larger pet dander. Builder-grade filters.
- MERV 11: Adds fine dust, smaller pollen, vehicle exhaust particles. The right baseline for a normal home.
- MERV 13: Adds bacteria, finer smoke, virus-carrying droplets. The right baseline for allergy households.
- MERV 16+: Hospital-grade. Restricts airflow enough that most residential systems can’t push air through them.
The American Society of Heating, Refrigerating and Air-Conditioning Engineers (ASHRAE) recommends MERV 13 for indoor air quality in residential homes, and the EPA’s IAQ guidance matches. The hesitation people have is that higher-MERV filters restrict airflow, that’s true, but only if you’re using a 1-inch filter slot. Most residential furnaces handle MERV 13 in a 1-inch slot fine; if airflow becomes an issue, switch to a 4- or 5-inch pleated filter housing, which provides the same filtration with much less restriction.
Cost difference: a MERV 11 filter is $15 to $25 vs. $2 for the bottom-tier. Replaced every 90 days, that’s $60 to $100 a year vs. $8. The dust reduction is dramatic in the first month.
Change cadence: every 60 to 90 days, or every 30 days if you have shedding pets or run the system constantly (summer AC, winter heat).
Step 2: Seal the Return-Air Ductwork
The return ducts are the ones that pull air from the rooms back to the furnace. If they leak (which is most ductwork in homes built before 2000), they pull air from wherever they are, attics, crawlspaces, wall cavities, instead of from the rooms.
Attic air is dusty. Crawlspace air is dustier. Wall cavity air has fiberglass insulation dust, drywall dust, and rodent droppings. All of it ends up in your supply air and back into your rooms.
To find the leaks:
- Turn the HVAC fan to “On” at the thermostat (forces the fan to run continuously, not just on heat/cool cycles).
- Walk along your visible ductwork in the basement, attic, or utility area.
- Hold a tissue or a thin strip of toilet paper near every duct joint, especially around the air handler, around the return-air plenum (the big box on top or beside the furnace), and at every elbow.
- Movement of the tissue means a leak.
Common leak spots:
- The seam where the return-air plenum bolts to the furnace cabinet.
- The takeoff collars where each branch duct connects to the trunk line.
- The corners of rectangular sheet-metal ducts.
- Any place a previous tech opened the duct and re-sealed it with foil tape that’s now peeling.
Seal them with mastic (Hardcast HCS-7 or similar gray sealing compound, $15 a tub) applied with a brush or gloved hand. Foil tape (Nashua 324A or Shurtape AF913, UL-181 listed) works for short-term fixes but mastic is the right long-term seal.
DO NOT use cloth-backed duct tape. The name is a historical mistake, “duct tape” has never been rated for use on ducts and the adhesive fails within a year of heating/cooling cycles.
If your ducts are inside the conditioned space and you can’t easily reach them, an HVAC company can do an Aeroseal treatment (a sealant injected into the duct system that finds and seals leaks from the inside, about $1,500 to $3,000) which is invasive but cuts duct leakage by 70 to 90 percent.
Step 3: Seal the Attic Hatch
The attic hatch (the pull-down ladder or the small access panel in a ceiling) is one of the largest air leaks in most houses. The attic is connected to the outside through soffit vents and ridge vents (correctly, for moisture control), and the attic is full of insulation fibers, dust from decades of accumulation, and (in older homes) vermiculite or asbestos remnants.
For a hatch:
- Weatherstrip the hatch edge with peel-and-stick foam (M-D Products or Frost King).
- Install a hatch insulator (a foam box that sits on top of the hatch in the attic). Battic Door makes a standard $50 kit.
For a pull-down attic stairs:
- Same foam weatherstrip on the wood frame.
- An attic stair cover (insulated box, $80 to $150) on top of the stairs in the attic.
This single fix alone reduces dust noticeably in 1- and 2-story homes within a couple of weeks.
Step 4: Seal Recessed (Can) Lights
Pre-2010 recessed lights (“can lights”) are notorious air leaks. They’re a 6-inch hole in the ceiling with a metal can on the other side, vented for cooling of the old incandescent bulb. Each light moves about 6 to 10 cubic feet of attic air per hour into the room below.
A house with 20 can lights is moving 120 to 200 cubic feet per hour of unfiltered attic air into the living space. That’s not trivial.
Two fixes:
- Replace each fixture with an IC-rated (Insulation Contact) and air-sealed LED retrofit. $20 to $35 per light, fits in the existing can, screws into the existing socket. The seal is built into the retrofit. This is the best fix.
- Install a can light cover in the attic above each light. Tenmat makes ceiling-light covers ($15 each). Only works if the existing can is rated for insulation contact (most pre-2000 cans are not, check before piling insulation on top).
LED retrofits also drop the lighting electricity bill significantly, an old 65-watt halogen replaced with an 11-watt LED saves about $30 per light per year if it’s on 4 hours a day.
Step 5: Check the Dryer Vent
If your dryer’s outside vent flap doesn’t close fully, every windy day pushes outdoor dust back through the vent and into the dryer cabinet, which then leaks into the laundry room. Stand outside on a windy day with the dryer off and look at the vent, the flap should be flat against the wall. If it’s stuck open with lint or dryer film, clean it.
A clean dryer vent is also a fire-safety issue, see our dryer vent cleaning guide for the full procedure.
Step 6: Add an Air Purifier as the Final Layer
After steps 1 through 5, an air purifier acts as a polishing layer for the inside-generated 40 percent of dust (skin cells, fabric fibers, pet dander). Before steps 1 through 5, an air purifier is fighting a losing battle against an unsealed house.
A residential-grade purifier (Coway Mighty, Levoit Core 400S, Winix 5500-2) with a HEPA filter and activated carbon costs $150 to $300 and serves a 350 to 400 square foot room. One per main living area is enough.
Run it on the lowest setting continuously. Higher fan settings are louder and don’t substantially improve filtration since the air keeps cycling through.
Common Mistakes to Avoid
Closing supply registers in unused rooms. This sounds like it should help by routing air to occupied rooms only. It actually hurts: closing registers raises pressure in the duct system, which pushes more air out through leaks (Step 2), and reduces overall system airflow, which makes the AC less efficient. Leave all registers open.
Buying the cheapest 1-inch fiberglass filter. It’s labeled “for protection of HVAC equipment,” not for air quality. It catches enough lint to keep the blower clean. It doesn’t catch what makes your house dusty.
Skipping return-duct sealing because the supply ducts look clean. Return-duct leaks pull in dust; supply-duct leaks push conditioned air out. Both are bad, but for dust specifically, the returns matter most. Seal them first.
Buying a HEPA whole-house filter without checking your blower can handle it. Whole-house HEPA units add significant static pressure to the duct system. Older furnaces (2000s and earlier) often can’t push air through a HEPA filter effectively, which leads to short cycling and eventual blower motor failure. Have an HVAC tech assess your system before going whole-house HEPA.
Cleaning the surface dust without addressing the source. A spotless house gets dusty in a day if the source isn’t fixed. The cleaning is downstream of the problem.
FAQ
How fast will I see dust reduction after these changes? The filter upgrade (Step 1) is noticeable in 2 to 4 weeks, as the cleaner air slowly replaces the dustier circulating air. Duct sealing (Step 2) and gap sealing (Steps 3 to 4) are noticeable in 1 to 2 weeks. Most homeowners report a 60 to 80 percent reduction in surface dust after a full pass.
Are HEPA whole-house systems worth the investment? For most homes, no. A combination of MERV 13 furnace filter + sealed ducts + portable HEPA purifiers in main rooms achieves 80 to 90 percent of the air quality benefit of a whole-house HEPA installation, at 10 to 20 percent of the cost. Whole-house HEPA makes sense for severe allergy or asthma households, or for homes where the duct geometry can’t easily be sealed.
Does running the HVAC fan continuously help? A bit. The fan moves air through the filter constantly instead of only during heat/cool cycles, which catches more particles per hour. The downside is higher electricity use ($10 to $30 a month depending on motor type) and slightly more humidity in summer (the cooling coil’s condensate re-evaporates when the AC is off but the fan is on, putting moisture back in the air). For a modern ECM blower motor, the trade is usually worth it.
My pets are the dust source. Will any of this help? Pet dander is a real input but it’s downstream of the air filter. MERV 11 catches most pet dander; MERV 13 catches almost all of it. Plus, vacuuming with a HEPA-bagged vacuum (not bagless, the bagless models release dander when you empty them) twice a week reduces what gets airborne in the first place.
How do I find a good HVAC tech for the duct sealing? Look for NATE (North American Technician Excellence) certification, and ask if they do their own duct sealing or sub it out. The good ones use a duct blaster (a calibrated fan that pressurizes the ducts and measures leakage in cubic feet per minute). A complete duct seal job from a quality tech is $400 to $1,200 depending on house size and duct complexity, expensive but cuts dust noticeably and improves HVAC efficiency by 15 to 30 percent.
Does air filtration help with allergies and asthma? Yes, well-documented in clinical studies. The American Lung Association recommends MERV 11 or higher furnace filters and HEPA portable purifiers in bedrooms for households with allergy or asthma sufferers. The combination is the right starting point before any prescription medications.
Once you treat the house as a system pulling air in from places you don’t want, the fixes make sense in order: upgrade the filter, seal the ducts, plug the attic gaps. Most homeowners see a real difference in surface dust within a month, and the duct sealing keeps paying out on every cooling and heating bill after that. For the related “my house smells musty” symptom that often shares the same root causes, see our musty smell guide.